How We Built a Faux Stone Wall Using Eco Resin Casting Compound
- Mar 22
- 6 min read
When people think of eco resin casting compounds, they usually picture trinket trays, candle vessels, and coasters. Small, pretty things for market stalls and Etsy shops. And we love all of that — it's the bread and butter of what our community creates every day.
But Ecrylimer was never designed to stay small.
We recently took on a project that pushed our Ecrylimer compound into completely different territory: a pair of full-scale faux stone wall panels for a live event installation. They needed to look like real weathered rock, be lightweight enough to transport and install by hand, and be durable enough to survive an event with foot traffic.
Here's how we did it.
The Brief
The brief was simple in concept and well huge in execution: create two large stone wall panels that would form a walk-through entrance at a live event. The panels needed to be freestanding, roughly 2.4 metres tall, with organic broken-rock edges. They had to look convincingly like natural stone from close range — not painted plywood, not foam with a texture spray. Actual stone-like depth and detail.
Oh, and they needed to be light enough that one or two people could move them.
Materials
Here's what we used:
Ecrylimer BOLD+ Eco Casting Compound — our professional-grade casting compound, mixed to a thick consistency for layering - chosen for the extended working time. Ecrylimer Creator could also be used with Extender.
Blue builders foam (XPS insulation board) — the structural core. Lightweight, rigid, easy to cut into organic shapes
Aluminium composite panels (NuBond) — for the backing structure and rigidity (on custom made alum framing - these pieces are going to be permanently installed later and could be outside for other events)
Black, grey, white, and Earth pigments — for building up realistic stone colour variation
Shell chips and crushed glass — embedded into the surface layers for that natural mineral sparkle you see in real rock
Standard tools — scrapers, large mixing buckets, brushes
Total weight of each finished panel: a fraction of what actual stone would weigh. We're talking about something two people can easily carry that looks like it should need a forklift.

Step 1: Building the Structure
We started with aluminium composite panels cut into the rough shapes we wanted — tall, irregular profiles that would look like natural broken rock faces rather than anything with a straight edge. The organic shape of the edges is what sells the illusion, so we spent time getting those right before anything else.
Blue XPS builders foam was glued onto the front face of each composite panel (had an aluminium frame underneath). This gives us depth and a surface that Ecrylimer bonds to beautifully. The foam is incredibly light, rigid enough to hold its shape at this scale, and easy to carve or shape with basic tools.


Step 2: The First Coat
With the structure ready, we mixed Ecrylimer BOLD+ to a thick, almost buttery consistency — much thicker than you'd use for casting into a mould. This isn't pour-and-set work; it's layering, spreading, and building up texture by hand.
The first coat went on dark. We used concentrated black pigment to create the deep base tone that natural stone has underneath its surface variations. This coat was applied generously with scrapers and spread across the full surface of the foam panels, working it into all the edges and contours.
At this scale, you're going through buckets of compound. This isn't a 200ml mixing cup situation — we were working with full 5-litre buckets and large scrapers to cover the surface area.


Step 3: Building Up Texture and Colour
This is where the magic happens, and honestly, where the art comes in.
Real stone isn't one colour. If you look closely at a rock face, you'll see layers of dark and light, warm undertones where iron oxide has stained the surface, bright white veins of quartz, and areas where the texture changes from smooth to rough within centimetres.
We built this up in layers:
Layer 1 — Dark base. Black and dark grey, spread thick and allowed to partially set before the next layer. This creates the deep shadows and the darkest tones you see in the final piece.
Layer 2 — Mid tones. Grey mixed with a touch of raw umber for warmth. Applied more selectively — not covering everything, but building up the lighter areas where natural weathering would expose lighter rock underneath. This is where you start working with scrapers to create directional texture, dragging the compound to mimic the natural grain of sedimentary rock.
Layer 3 — Highlights and variation white and light grey, applied sparingly. These become the quartz veins, the lighter patches, the areas where rock has been exposed to weather. We also added touches of pink and copper tones — subtle, but they add the warmth that makes stone look real rather than painted.
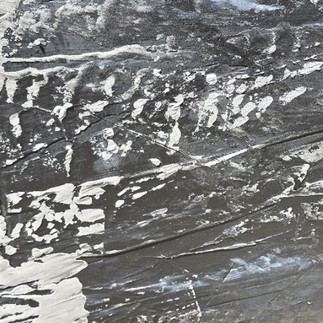
Layer 4 — Embedded materials. While the final layers were still workable, we pressed shell chips and crushed glass into the surface. This does two things: it adds genuine mineral texture that you can feel under your fingers, and it catches light the way real stone does. When you see that little sparkle in a rock face? That's what we're replicating.
Each layer was allowed to partially cure before the next was applied. The key word is partially — you want some grabbing and blending between layers, not clean separation. This is what creates the depth that makes it look geological rather than painted.


Step 4: Finishing and Detailing
Once all the layers were built up, we went back in with detail work. Using smaller tools and brushes, we enhanced specific areas — deepening shadows in recesses, adding extra highlights on raised areas, and ensuring the colour variation looked natural from multiple angles and distances.
The texture close-ups tell the story better than words can. Up close, you can see the different layers of colour blending into each other, the embedded chips catching the light, and the organic variation that comes from hand-applied compound rather than anything machine-made. It genuinely looks like a cross-section of natural rock. Using our Satin sealer just for protection and deepening of colours and a slight sheen.


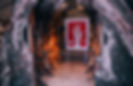
Step 5: Installation
The panels were transported to the venue and set up as a walk-through entrance — two freestanding stone walls creating a passage that visitors walked between to enter the event space. The organic broken-rock edges framed the space between them, and the scale of the pieces (over 2 metres tall) created a genuinely immersive experience.
From a distance, they read as stone. Up close, they still read as stone. That was the test, and it passed.
What This Means for Ecrylimer
This project proved something we've always known but hadn't demonstrated at this scale: Ecrylimer isn't limited to small castings. It's a legitimate surface coating and sculpting material that can be used for:
Event design and installations— freestanding walls, backdrops, immersive environments
Set design for film, theatre, and photography — realistic stone, concrete, and rock surfaces at a fraction of the weight
Prop making — any situation where you need something that looks heavy and permanent but needs to be light and transportable
Commercial fit-out — feature walls, retail displays, hospitality interiors
Public art and sculpture — large-scale outdoor or indoor works
The compound bonds to foam and it cures hard, takes pigment beautifully, and can be sealed.
The Technique in Summary
1. Build your structure from lightweight rigid materials (foam, aluminium, timber framing)
2. Mix Ecrylimer thick — thicker than you'd use for mould casting
3. Apply dark base coats first, building up to lighter tones
4. Work in layers, allowing partial curing between each
5. Embed natural materials (shell chips, crushed glass, sand) for genuine texture
6. Detail and refine once the main layers are set
7. Seal if needed for durability or outdoor use
Want to Try This?
Ecrylimer is available in casting packs and for a project like this, you're looking at the larger pack sizes. We also stock pigments, shell chips, crushed glass, and sealers — everything you need to create realistic stone, concrete, and rock finishes. Note - Ecrylimer Creator is a little stronger than Bold and more cost effective and would work for this, with extender to give you a similar longer working time.
If you're working on a set design, event installation, or large-scale creative project and want to chat about how Ecrylimer could work for your brief, get in touch. We love this stuff and we're always happy to talk through techniques and materials.
Shop Ecrylimer BOLD+: https://www.bramblier.co/product-page/ecrylimer-bold-water-liquid-activated-eco-casting-acrylic-resin-compound Shop Creator https://www.bramblier.co/product-page/ecrylimer-creator-economical-bulk-candle-making-eco-casting-resin Shop Extender (If using Creator you would need this to extend set time) https://www.bramblier.co/product-page/extender-ecrylimer-pro-retarder-500g-liquid-more-time-less-bubbles
Shop Pigments: https://www.bramblier.co/shop-1?Category=Pigments
Shop Shell Chips & Crushed Glass: https://www.bramblier.co/shop-1?Category=Decorative%2520Items Shop Satin Sealer https://www.bramblier.co/product-page/ecrylimer-satin-colour-lock-water-based-sealer